
There is something inherently magical about an egg. It is the ultimate symbol of beginnings, mystery, and hidden beauty. Throughout history, from Fabergé’s imperial masterpieces to ancient folklore, the egg has represented the unveiling of something precious. Now, you can capture that same sense of wonder and elegance in your own DIY creations.
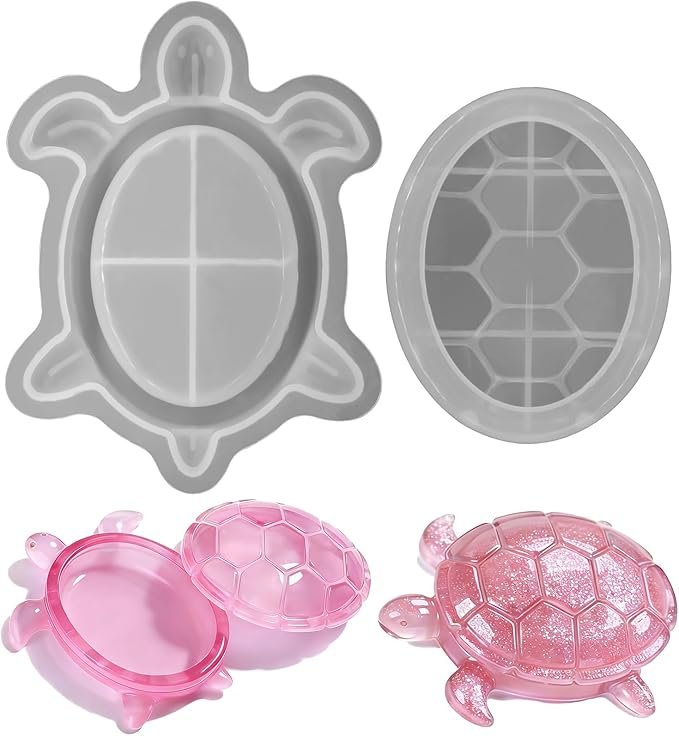
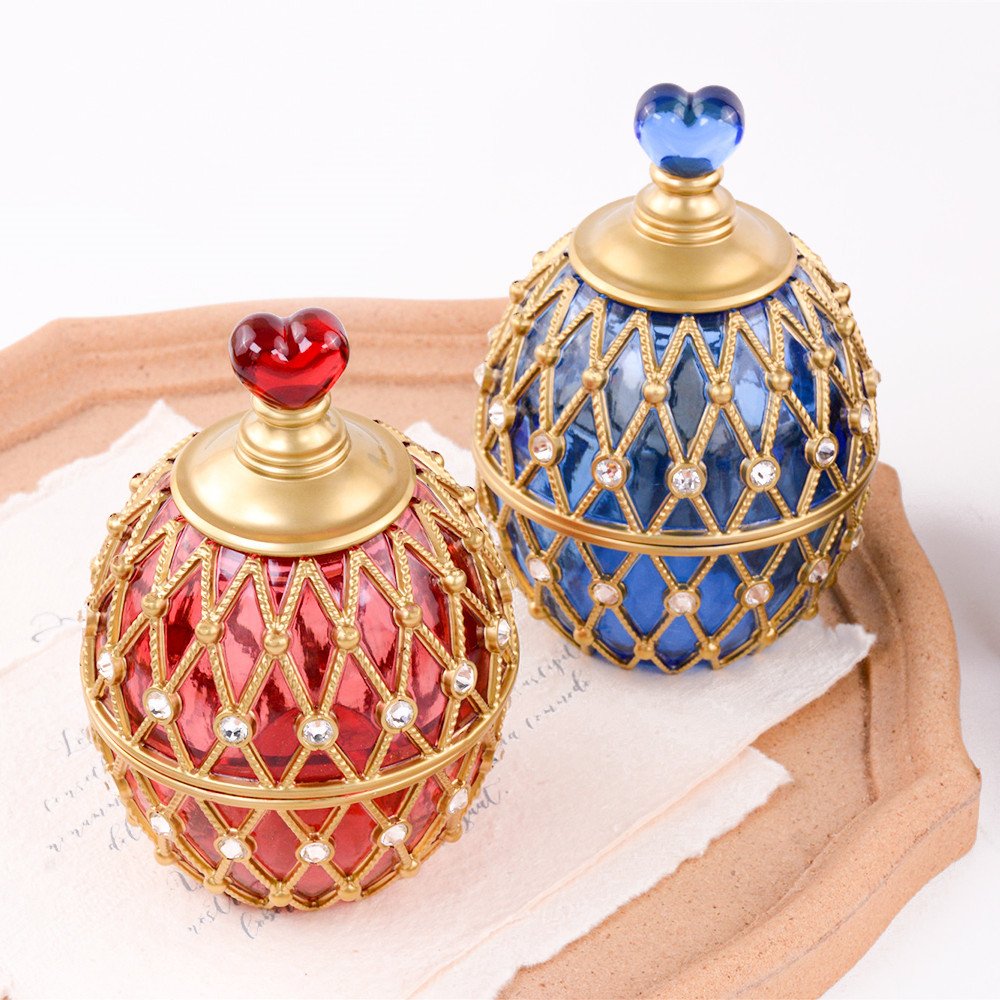
Imagine a sleek, glossy egg sitting on a vanity table. It looks like a simple decorative object—until you lift the top to reveal a sparkling interior, perhaps adorned with shimmering rhinestones, designed to hold rings, earrings, and other precious keepsakes. This is the art of the resin egg jewelry box, and with the OCHCHO Egg-Shaped Jewelry Box Silicone Mold Kit, it is an art that everyone can master.
Crafted in the manufacturing hub of Dongguan, this premium silicone mold set is designed for creators who demand quality and versatility. But OCHCHO goes a step further. Included with the mold are 100 pieces of 6.5mm rhinestones, giving you everything you need to add that extra touch of glamour right out of the box. Packaged conveniently, this white silicone mold is your gateway to creating stunning, functional art.
In this comprehensive guide, we will explore the endless possibilities of the OCHCHO Egg Jewelry Box Mold, walk you through the step-by-step process of creating a rhinestone-encrusted masterpiece, and explain why this kit is a must-stock item for any wholesale buyer.
Part 1: The Allure of the Egg – Form Meets Function
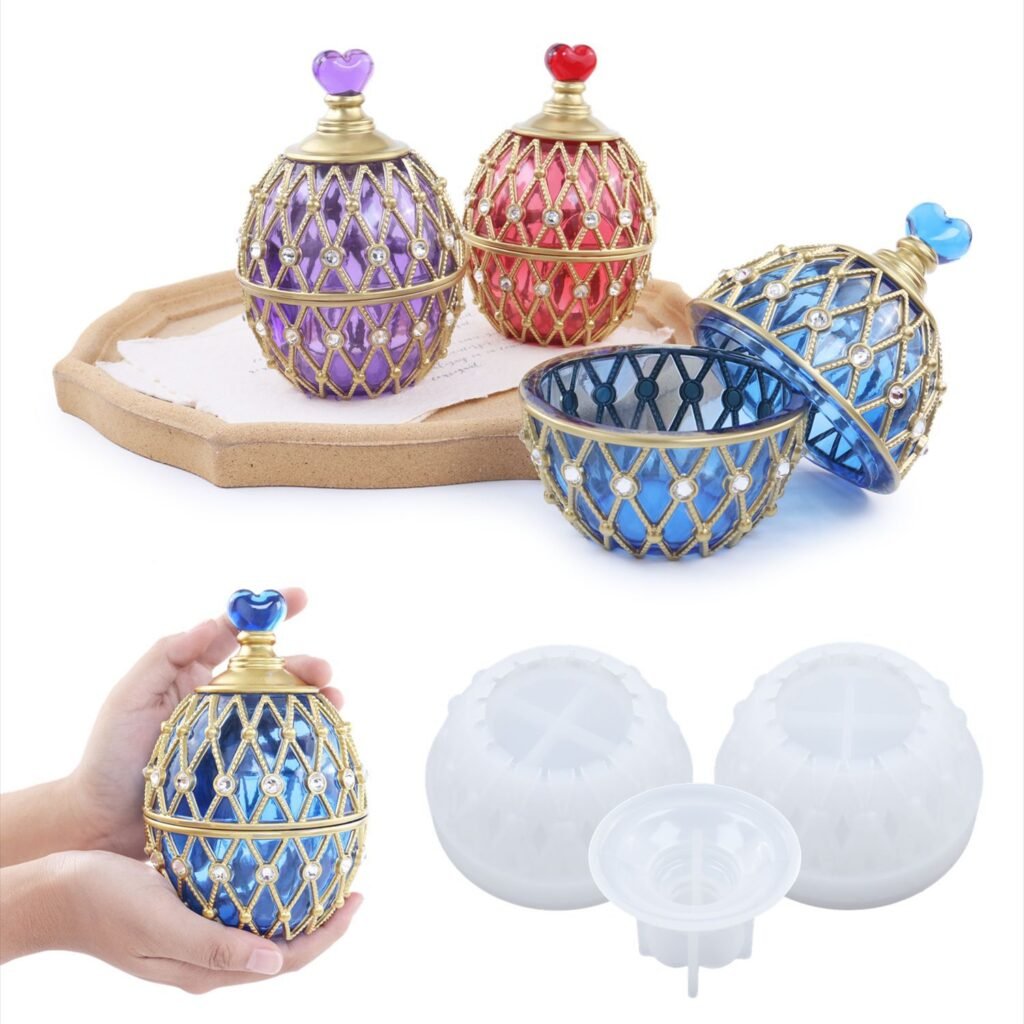
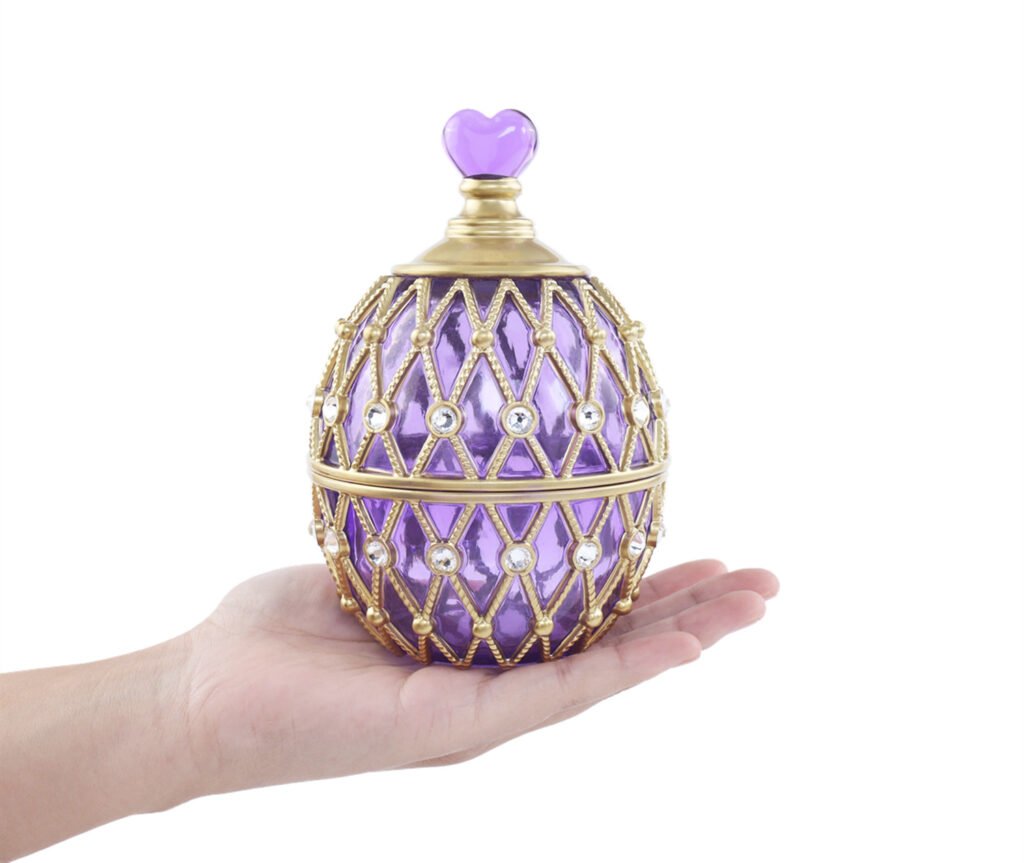
Why an egg? The shape is deceptively simple, yet profoundly satisfying. An egg-shaped box is ergonomic to hold, pleasing to the eye, and universally appealing. It fits comfortably in the palm of your hand, making it the perfect size for a jewelry holder or a trinket dish.
The Rise of Resin Storage
In the world of home decor and organization, there has been a significant shift toward handmade, artful storage solutions. Mass-produced plastic organizers are being replaced by unique, artisanal pieces that serve as both functional tools and decorative accents. A resin jewelry box sits at the intersection of utility and beauty. It organizes your space while simultaneously elevating it.
The Rhinestone Factor
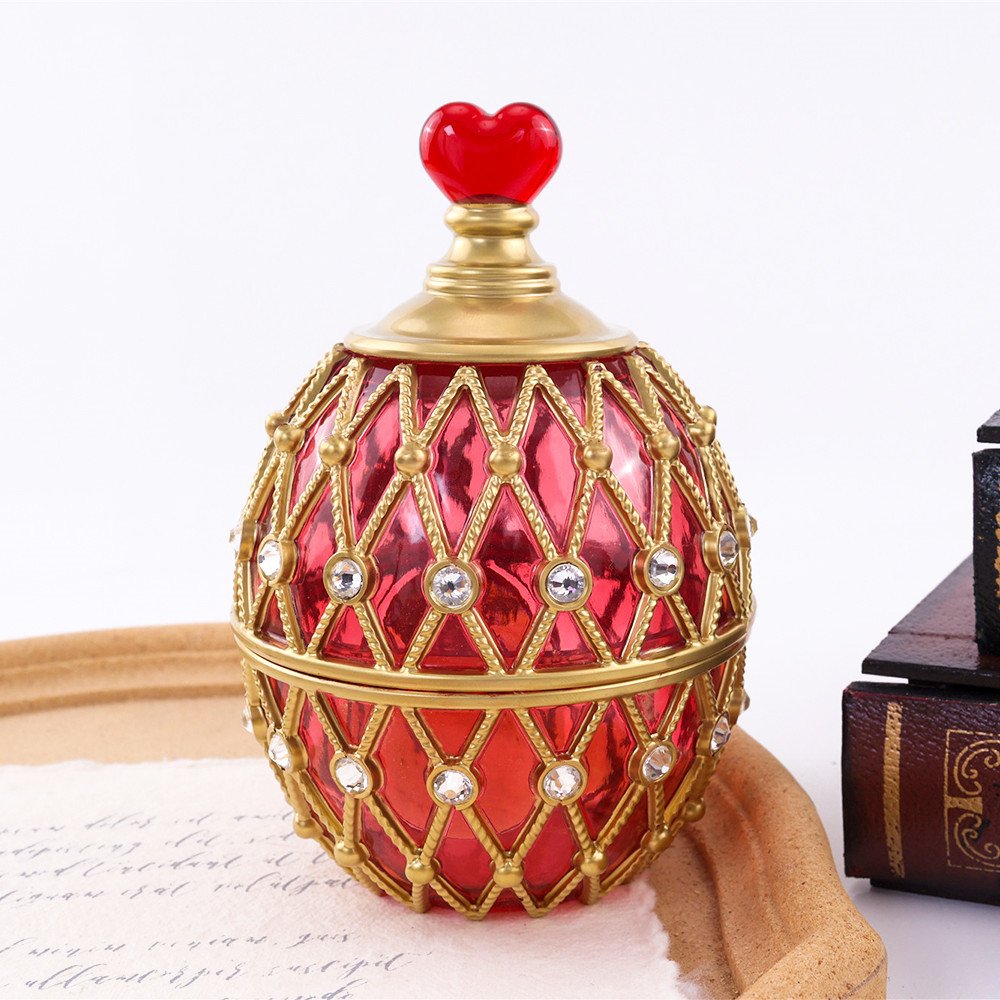
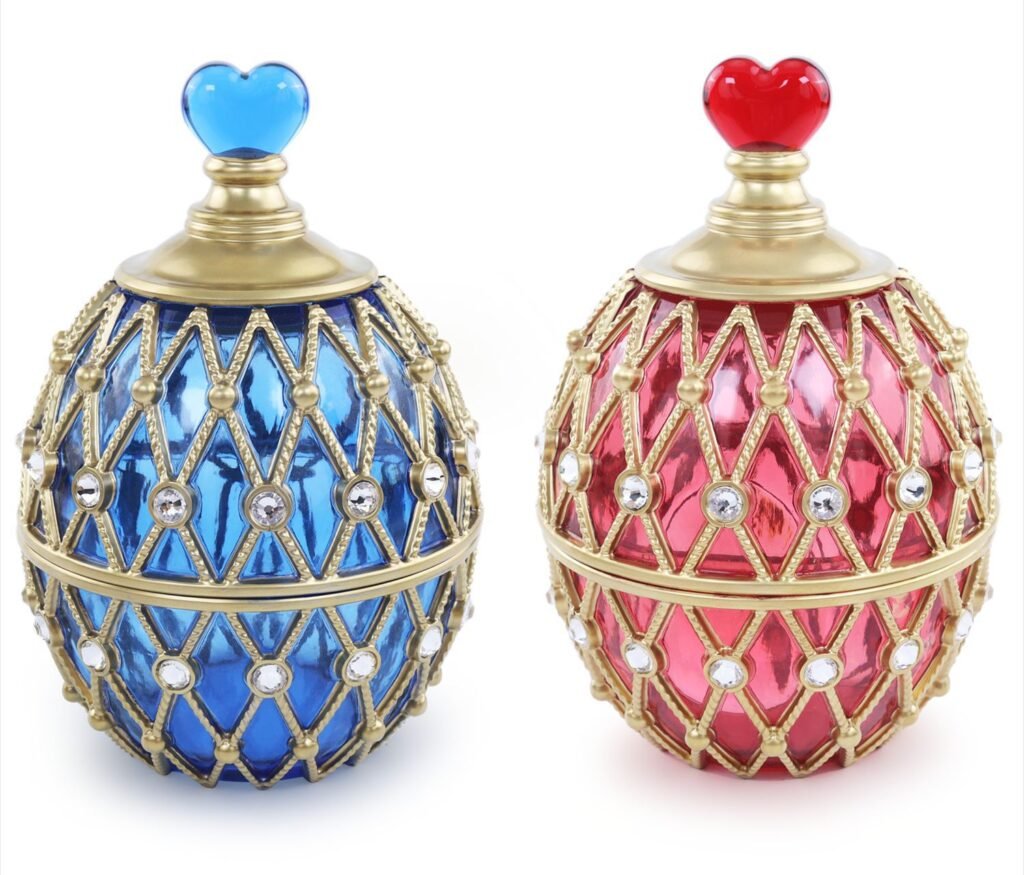
Rhinestones add a touch of luxury and sparkle that transforms a simple resin piece into a statement item. Whether you’re creating a gift for a bride, a treat for yourself, or inventory for your small business, a rhinestone-encrusted box feels special. It catches the light, draws the eye, and whispers “treasure” before it’s even opened.
By including 100 pieces of 6.5mm rhinestones with the mold, OCHCHO ensures that your first project—and your next several—can be finished with professional-grade embellishments. These are the perfect size for accenting the lid, the base, or creating intricate patterns on the egg’s surface.
Part 2: Introducing the OCHCHO Egg-Shaped Jewelry Box Mold Kit
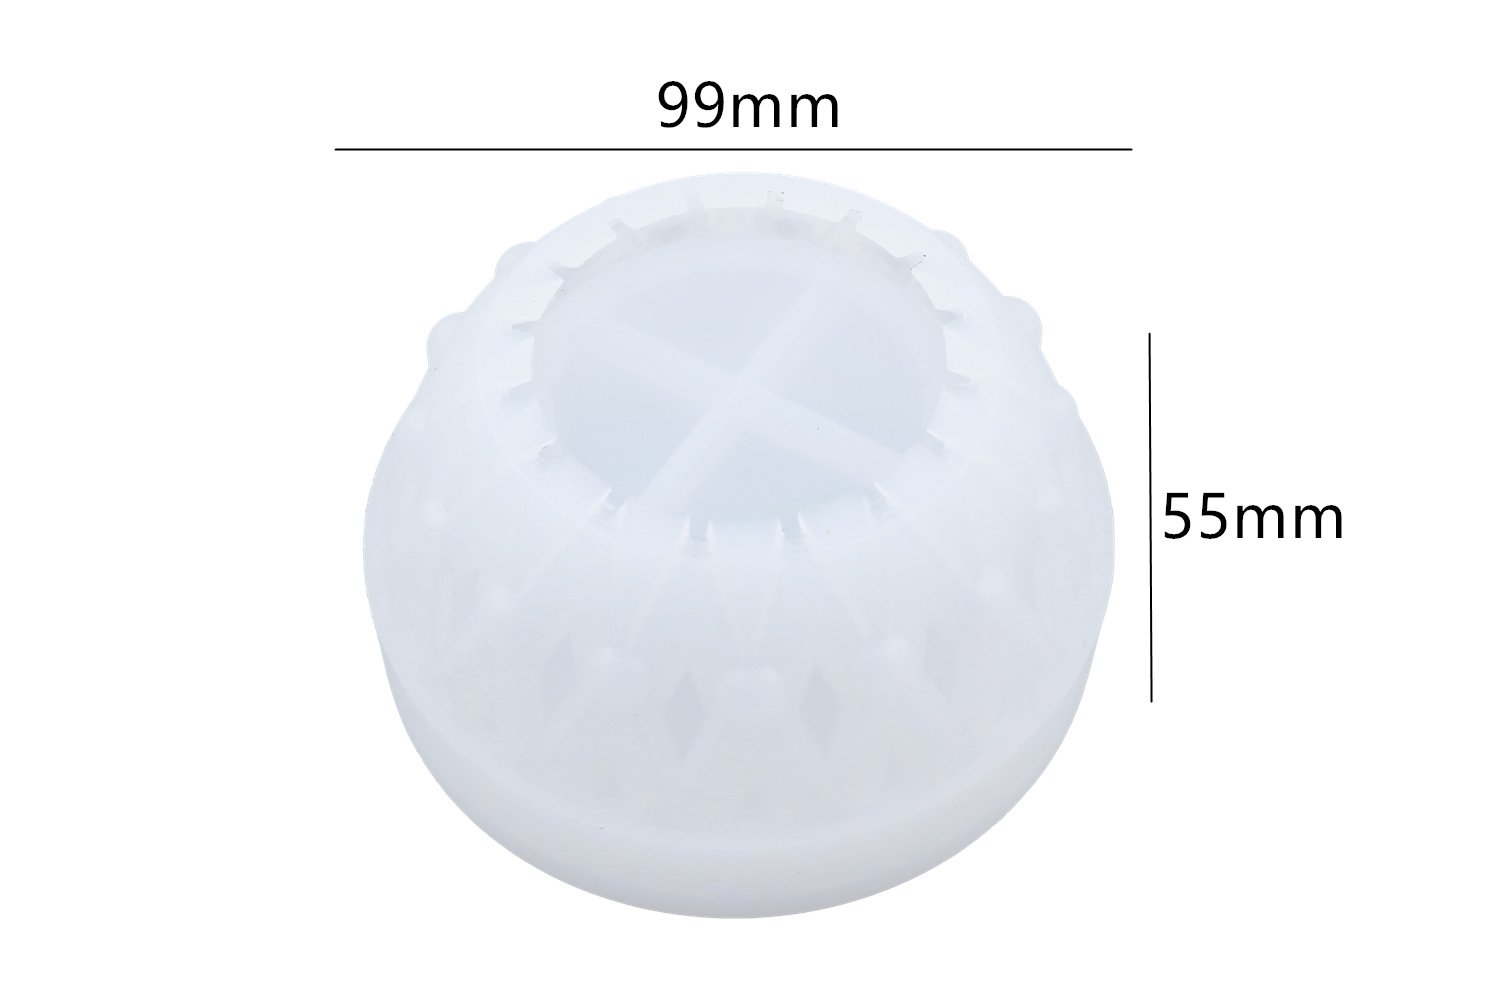
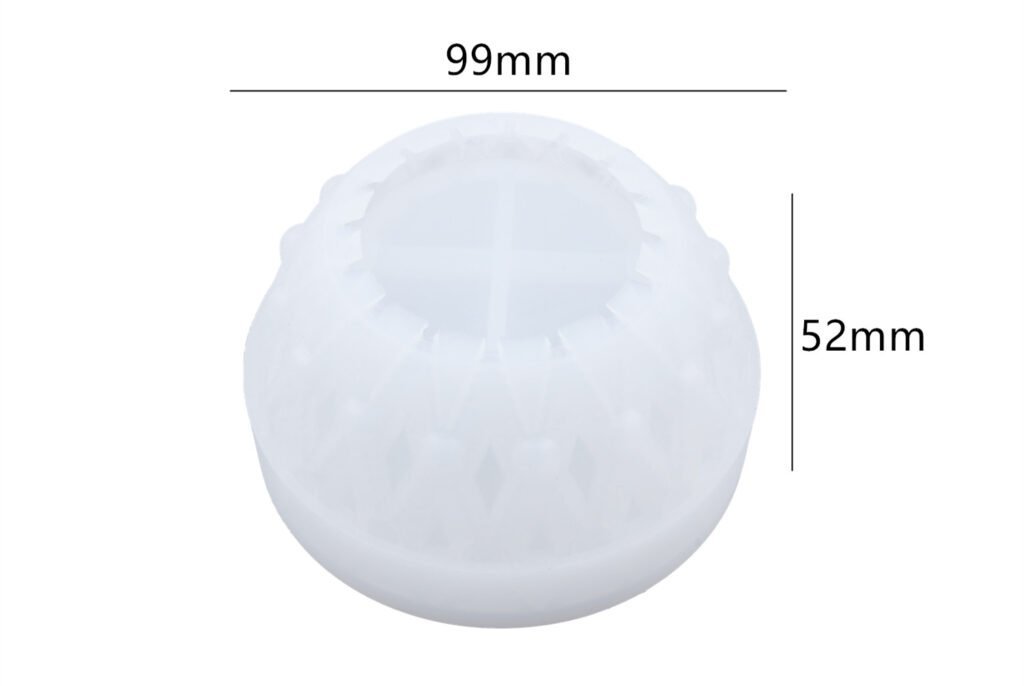
The OCHCHO Egg-Shaped Jewelry Box Mold is precision-engineered from high-quality white silicone. Hailing from Dongguan, a region renowned for its manufacturing excellence, this mold is built to last.
What’s in the Kit?
The Silicone Mold:
This is a two-part mold designed to create a box with a removable lid. The mold features:
- Smooth, Glossy Finish: The interior of the mold is polished to a high shine, ensuring your resin cures with a glass-like finish that requires minimal sanding or polishing.
- Precision Engineering: The mold is designed to create a snug fit between the lid and the base. The lid should sit perfectly on the box, staying in place but lifting off easily.
- Durable Silicone: Made from flexible, food-grade silicone, this mold will withstand hundreds of pours without tearing or losing its shape. The flexibility also makes demolding effortless.
The 100 Rhinestones:
The inclusion of 100 pieces of 6.5mm rhinestones is a game-changer. These are not afterthoughts; they are integral to the kit. The 6.5mm size is versatile—large enough to make a statement, but small enough to allow for detailed, intricate designs. Whether you want to create a single, dramatic stone on the lid or a cascading pattern of sparkle, you have the materials to do so.
The OCHCHO Quality Promise
As a brand, OCHCHO is committed to providing creators with tools that inspire confidence. This mold set is designed to be:
- Beginner-Friendly: The simple, elegant shape is forgiving for those new to resin, while the rhinestones offer an easy way to add professional polish.
- Pro-Level Durable: Experienced resin artists will appreciate the quality of the silicone and the precision of the mold design.
- Versatile: While designed for epoxy resin, this mold can also be used with polymer clay, plaster, and even soap-making materials.
Part 3: From Mold to Masterpiece – A Step-by-Step Tutorial
Creating your own rhinestone-encrusted egg jewelry box is a rewarding process. Here is a comprehensive guide to using your OCHCHO Egg Mold Kit.
Materials You Will Need
- OCHCHO Egg-Shaped Jewelry Box Silicone Mold
- 100 pieces of 6.5mm rhinestones (included)
- High-quality Epoxy Resin (2-part epoxy)
- Resin pigments (mica powders, alcohol inks)
- Glitter or other inclusions (optional)
- Mixing cups, stirring sticks, and a heat gun or torch
- Disposable gloves and a dust mask
- Fine-grit sandpaper (400-2000 grit)
- Resin-safe glue (for attaching rhinestones, if not embedding them)
- Tweezers (for precise rhinestone placement)
- A level crafting surface
Instructions
Step 1: Prepare Your Workspace
Set up a clean, well-ventilated area. Cover your work surface with a silicone mat or wax paper. Ensure your surface is perfectly level using a spirit level—if the surface is not level, your resin will cure with a slanted edge, and the lid may not fit properly. Gather all your materials and put on your gloves.
Step 2: Prepare the Mold
Ensure your OCHCHO silicone mold is clean and completely dry. Any dust or moisture can cause cloudiness in the final product. You can use a piece of adhesive tape to lift any lint or dust from the mold cavities.
Step 3: Mix Your Resin
Carefully measure and mix your epoxy resin according to the manufacturer’s instructions. Most resins require a precise 1:1 ratio by volume or weight. Using a digital scale is the most accurate method. Stir slowly and thoroughly for 3-5 minutes, scraping the sides and bottom of your cup to ensure complete mixing. Slow stirring helps minimize bubbles.
Pro Tip: For a box this size, you will likely need to pour in layers to achieve different effects and to properly embed decorations.
Step 4: First Layer (The Interior and Base)
Pour a thin layer of resin into the bottom of the mold. This will become the interior floor of your box. If you want a colored interior, tint this layer with mica powder or alcohol ink. Use a heat gun or torch to pop any surface bubbles.
Allow this layer to cure until it is “tacky” (sticky but not liquid). This usually takes a few hours, depending on your resin. This tacky stage is the perfect time to add inclusions without them sinking to the bottom.
Step 5: Adding the Rhinestones (Option 1: Embedded)
If you want the rhinestones to be embedded within the resin (creating a smooth, glossy surface over the stones), place them on the tacky first layer. Use tweezers to arrange them in your desired pattern. Once placed, gently pour the next layer of resin over them, ensuring they are fully covered. The resin will act as a magnifying glass, making the stones appear larger and more brilliant.
Step 6: Adding the Rhinestones (Option 2: Surface Mounted)
If you prefer the rhinestones to sit on the surface of the finished box (giving a textured, bejeweled look), pour the main body of the box first and let it cure completely. Once demolded, use a strong resin-safe glue to attach the rhinestones to the exterior.
Step 7: Pouring the Main Body
Continue pouring your resin into the mold, filling it to the brim. If you are creating a multi-colored or layered effect, pour different colored resins from different sides of the mold -7. The colors will interact in interesting ways without completely blending.
Step 8: Eliminate Bubbles
After each pour, use a heat gun or torch to remove bubbles. Pass the flame quickly over the surface—do not linger in one spot, as excessive heat can damage the mold or distort the resin. Pay special attention to the corners and details of the mold, using a toothpick to coax out any trapped bubbles.
Step 9: Cure
Cover the mold with a dust cover (a cardboard box works well) to prevent lint, pet hair, or dust from landing in the resin. Allow it to cure undisturbed for the recommended time—typically 24 to 72 hours for epoxy resin, depending on the depth and brand.
Step 10: Demold
Once fully cured, it’s time for the big reveal. Gently flex the OCHCHO silicone mold away from the resin. The egg box should pop out effortlessly. If it feels stuck, place the mold in the freezer for 15 minutes—the cold will cause the resin to contract slightly, making it easier to remove.
Step 11: Finishing Touches
Inspect your box for any imperfections. If there are minor scratches or uneven edges, sand them smooth using progressively finer grits of sandpaper, starting at 400 and moving up to 2000 for a glass-like finish -1. Wipe with isopropyl alcohol between stages.
If you chose to surface-mount your rhinestones, now is the time to glue them on. Apply a tiny dot of resin-safe glue to the back of each stone and place it carefully using tweezers. Allow the glue to cure fully.
Part 4: Creative Inspirations – What Can You Create?
The OCHCHO Egg Jewelry Box Mold is a versatile canvas. Here are some ideas to spark your creativity.
The Bridal Keepsake
Create a white or ivory egg box with a pearlized finish. Embed tiny pearls or use the included rhinestones to spell out the bride and groom’s initials on the lid. This makes a stunning gift for the bride to hold her wedding ring or jewelry on the big day.
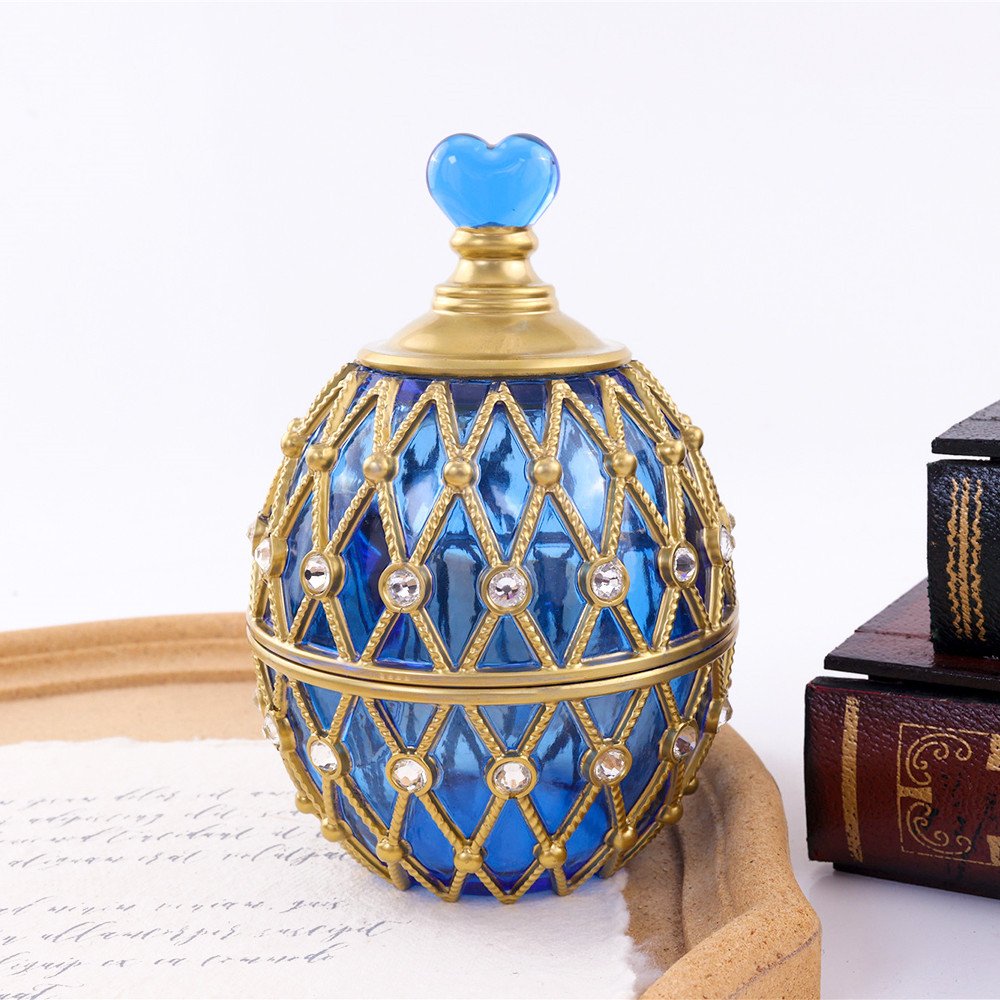
The Galaxy Egg
Use deep blues, purples, and blacks with alcohol inks to create a cosmic swirl effect. Add a touch of holographic glitter for stars. Mount silver or iridescent rhinestones on the lid to represent constellations.
The Vintage Cameo
Create an egg in a soft, opaque color like mint green or blush pink. Once cured, use the included rhinestones to create a vintage-inspired frame on the front of the egg, perhaps surrounding a small cameo or photo transfer.
The Minimalist Marvel
Sometimes, less is more. Create a crystal-clear egg with no color. Let the beauty of the shape and the glossy resin speak for itself. Add a single, carefully placed rhinestone on the lid for a subtle touch of elegance.
The Gift Set
Create a set of eggs in varying sizes or colors. Package them together as a “vanity set” for a truly luxurious gift.
Part 5: The Wholesale Advantage – Why Stock OCHCHO?
For business owners, the OCHCHO Egg-Shaped Jewelry Box Mold Kit represents a significant opportunity. Here is why this product deserves a place in your inventory.
The Complete Package
This isn’t just a mold; it’s a project kit. By including 100 pieces of 6.5mm rhinestones, OCHCHO has removed a barrier for customers. They don’t need to source embellishments separately. This completeness makes the kit more attractive to buyers and increases its perceived value.
Tapping into the Home Decor and Gifting Markets
Resin jewelry boxes are popular for several reasons:
- Personal Use: Crafters love making beautiful organizers for their own homes.
- Gifting: A handmade resin box filled with small treats or jewelry makes an incredibly personal and cherished gift for birthdays, anniversaries, and weddings.
- Resale: Many crafters sell their finished pieces at markets or online. The egg shape is unique and eye-catching, making it a potential bestseller.
The “Egg” Appeal
The egg shape is timeless and universally appealing. It’s not tied to a specific holiday or trend, meaning this mold will sell year-round. It appeals to fans of minimalist design, lovers of whimsical decor, and anyone who appreciates beautiful storage.
The OCHCHO Brand Trust
Crafted in Dongguan, OCHCHO has built a reputation for quality. Customers know that when they buy an OCHCHO product, they are getting durable, food-grade silicone that will last. The inclusion of high-quality rhinestones further enhances the brand’s value proposition.
Perfect for Beginners and Pros Alike
The simple, elegant design of the egg mold makes it accessible to beginners, while the potential for complex colorwork and rhinestone designs keeps it interesting for experienced artists. This broad appeal means you can market this kit to a wide audience.
Part 6: Caring for Your OCHCHO Silicone Mold and Finished Pieces
To ensure your investment lasts for years of creative enjoyment, proper care is essential.
Caring for Your Mold
- Before First Use: Wash the mold with warm, soapy water to remove any dust or residue. Dry thoroughly.
- During Use: Avoid using sharp objects inside the mold cavities, as they can cut or damage the silicone.
- After Use: If resin has cured inside the mold, flex the silicone gently—the cured resin will often pop right out. For any residue, wash immediately with warm, soapy water.
- Storage: Store your mold flat in a cool, dry place away from direct sunlight to prevent warping.
Caring for Your Finished Resin Egg Box
- Cleaning: Clean your resin box with a soft, damp cloth. Avoid harsh chemicals or abrasive cleaners that could scratch the surface.
- Rhinestone Care: If you surface-mounted your rhinestones, handle the box gently to avoid knocking them off. Store it in a safe place where it won’t be bumped.
- Avoid Extreme Heat: Prolonged exposure to direct sunlight or high heat can eventually yellow resin and weaken adhesives.
Part 7: Troubleshooting Common Issues

Even experienced resin artists encounter problems sometimes. Here are solutions to common issues.
Cloudy or Sticky Resin
This usually indicates that the resin and hardener were not mixed properly, the mixing ratio was off, or the room temperature was too cold during curing. Always measure precisely and mix thoroughly.
Bubbles in the Finished Piece
Bubbles are often caused by mixing too vigorously or pouring too quickly. Mix slowly, pour in a thin stream, and always use a heat gun or torch after pouring.
Lid Doesn’t Fit
If the lid is too tight or too loose, it’s usually because the surface wasn’t level during curing. Always check your workspace with a spirit level before pouring.
Rhinestones Falling Off
If you surface-mounted your rhinestones, ensure you are using a strong, resin-safe adhesive. Clean both the resin surface and the back of the rhinestone with alcohol before gluing to remove any oils or residue.
Conclusion: Unveil Your Creativity with OCHCHO

There is something undeniably satisfying about creating a beautiful, functional object from liquid resin. And when that object is an elegant, rhinestone-encrusted egg box, the satisfaction is multiplied. It becomes more than just a storage container; it becomes a treasure in its own right.
With the OCHCHO Egg-Shaped Jewelry Box Silicone Mold Kit, you have everything you need to begin this rewarding journey. From the precision-engineered silicone mold to the 100 pieces of 6.5mm rhinestones, every element is designed to help you succeed. Whether you are crafting a gift for a loved one, building an inventory for your small business, or simply exploring a new creative hobby, this kit provides the tools you need to bring your vision to life.
So, mix your resin, arrange your rhinestones, and prepare to unveil something beautiful. With OCHCHO, every egg holds a treasure—including the one you create.
Ready to add the elegance of egg-shaped jewelry boxes to your craft room or inventory? Contact OCHCHO today to place your wholesale order for the Egg-Shaped Jewelry Box Mold Kit with 100 Rhinestones and give your customers the tools to create treasures that last a lifetime


Contact me for custom procurement.:silicone@silic0ne.com