
There comes a moment in every crafter’s journey when wearable art is no longer enough. You’ve made pendants for every friend, earrings for every occasion, and keychains that dangle from every bag in the house. Your jewelry box overflows with handmade treasures. What’s next?
You look around your living space and see it: the empty corners, the plain tabletops, the shelves begging for something unique. Your home deserves the same personal touch that your wardrobe enjoys. It’s time to bring your resin artistry into the realm of home decor.
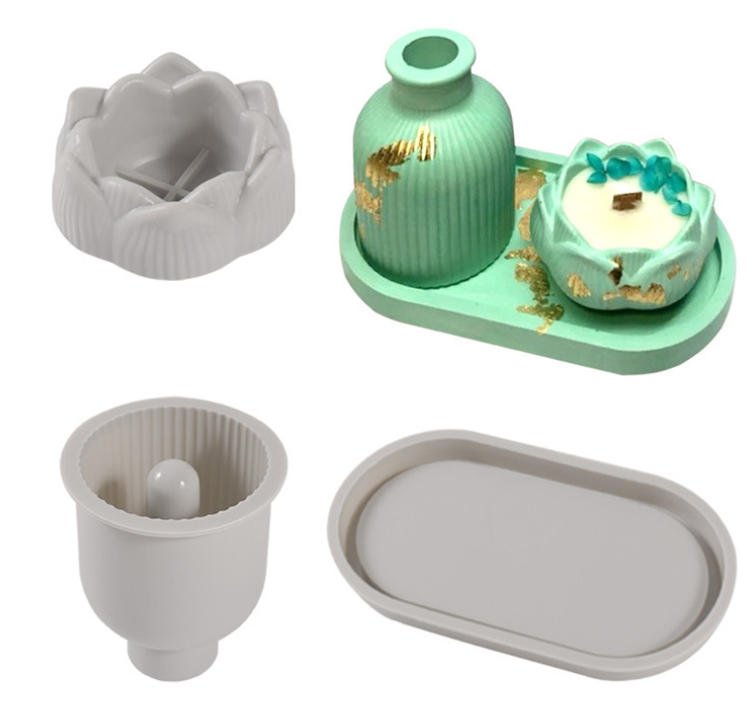
Welcome to the world of OCHCHO home decor silicone molds—where functional art meets sophisticated design. Today, we’re exploring three stunning mold categories that will transform your living space: the elegant striped vase mold, the intricate lotus storage box mold, and the versatile oval tray mold. Each one offers a new canvas for your creativity, and each is crafted with the quality you’ve come to expect from OCHCHO.
Why Home Decor Resin Crafting?
The home decor market is saturated with mass-produced items that lack soul. Walk into any big-box store, and you’ll find rows of identical vases, generic trays, and forgettable organizers. They serve a function, but they don’t tell a story.
Creating your own home decor pieces with epoxy resin changes everything:
- Uniqueness: No one else will have the same vase on their mantel.
- Customization: Match your color scheme perfectly.
- Personal Expression: Embed items that mean something to you—dried flowers from your garden, shells from a cherished beach vacation, or pigments that reflect your mood.
- Gift-Giving: Handmade home decor makes unforgettable housewarming presents.
- Therapeutic Creation: There’s something deeply satisfying about making objects you’ll use and see every day.
Moreover, larger resin pieces like vases and trays introduce new techniques and challenges that expand your skills as a maker. You’ll learn about deeper pours, structural considerations, and working on a larger scale.
Meet the OCHCHO Home Decor Collection
OCHCHO has long been a trusted name in the resin crafting community for their precision silicone molds. Now, their home decor line takes everything crafters love about their products—superior silicone, thoughtful design, and exceptional durability—and applies it to larger, more ambitious projects.
The collection features two elegant color options:
- Gray (Pantone 428C): A sophisticated, neutral gray that mimics the look of concrete or stone. This color is perfect for modern, industrial aesthetics and provides a beautiful backdrop for vibrant resin colors.
- Semi-Transparent White: The classic OCHCHO finish that allows you to see your resin as you pour. It’s bright, clean, and lets your colors truly shine.
Both colors are available in two convenient packaging formats:
- PE Dust Bag (Wholesale / Bulk): Ideal for serious makers who go through multiple molds or for retailers stocking up on inventory.
- OPP Set: Beautifully packaged in clear OPP (oriented polypropylene) material, perfect for individual crafters or gifting.
Let’s dive into each mold type and discover the creative possibilities they hold.
1. The Striped Vase Mold: Elegance in Every Line
There’s something timeless about a striped vase. The vertical lines create visual interest, elongate the form, and catch light in fascinating ways. OCHCHO’s striped vase mold brings this classic design into the realm of epoxy resin, allowing you to create stunning floral displays that are works of art in themselves.
Design Features
The striped vase mold features carefully crafted ridges that run vertically along the body of the vase. These stripes are not merely decorative—they serve several purposes:
- Light Interaction: The ridges catch and reflect light differently than smooth surfaces, creating depth and movement.
- Structural Integrity: The ribbed design adds strength to the finished piece, which is important for a functional vase that will hold water and flowers.
- Visual Interest: Even in monochromatic colors, the stripes create subtle shadow lines that prevent the piece from looking flat.
What You Can Create
Modern Minimalist Vase
Pour a single color—perhaps a deep navy, a forest green, or a soft blush—and let the stripes do all the work. The result is a sophisticated piece that would look stunning on a dining table or console.
Geode-Inspired Vase
Use the stripes as natural boundaries for color blocking. Fill each ridge with different shades of the same color family, or create a dramatic geode effect with crystal-like formations running through the stripes.
Embedded Nature Vase
Press dried flowers, ferns, or grasses into the resin, positioning them so they appear to grow from the base upward. The stripes provide a natural framework for these botanical inclusions.
Ombré Effect
Gradually transition from dark to light as you pour, letting the stripes emphasize the color gradient. Start with deep purple at the base and fade to lavender at the rim.
Project Idea: Dried Flower Striped Vase
Materials Needed:
- OCHCHO striped vase mold (gray or semi-transparent white)
- Epoxy resin (sufficient quantity for a deep pour—check your mold’s volume)
- Dried flowers or pressed botanicals
- Mixing cups and stir sticks
- Heat gun
- Gloves and safety equipment
Step-by-Step:
- Prepare Your Mold: Ensure your OCHCHO vase mold is clean and dust-free. Because OCHCHO silicone is naturally non-stick, no release agent is needed.
- Mix Your Resin: Calculate the volume needed for your mold. Mix resin and hardener according to manufacturer instructions, stirring slowly to avoid bubbles.
- First Layer Pour: Pour a thin layer of resin into the bottom of the mold—just enough to cover the base. This will be the foundation for your flowers.
- Arrange Botanicals: Using tweezers, carefully arrange your dried flowers in the first layer. Press them gently so they adhere. Position them with the knowledge that they’ll be visible through the sides of the finished vase.
- Cure Slightly: Let this first layer cure until it’s tacky (usually 2-4 hours, depending on your resin). This prevents flowers from floating when you pour the next layer.
- Second Pour: Mix more resin and carefully pour it into the mold, filling about halfway. The resin will flow around your arranged flowers and begin to fill the stripes.
- Bubble Removal: Use a heat gun to gently pass over the surface, popping any bubbles that rise. Be thorough—bubbles are more visible in deeper pours.
- Final Pour: Once the second layer has cured slightly, mix your final batch of resin and fill the mold to the top. The stripes will guide the resin into all areas.
- Final Cure: Allow the vase to cure completely—this may take 48-72 hours for a deep pour. Do not disturb during this time.
- Demold: When fully cured, gently flex the OCHCHO silicone mold. The vase should release easily. If there’s any resistance, continue flexing different areas rather than pulling.
- Finishing: Sand any sharp edges on the rim if needed. Your vase is now ready for flowers!
Styling Your Finished Vase
The striped vase works beautifully with:
- Single stems of dramatic flowers (like calla lilies or orchids)
- Dried pampas grass for a bohemian look
- Simple greenery for everyday elegance
- As a standalone sculpture, even without flowers
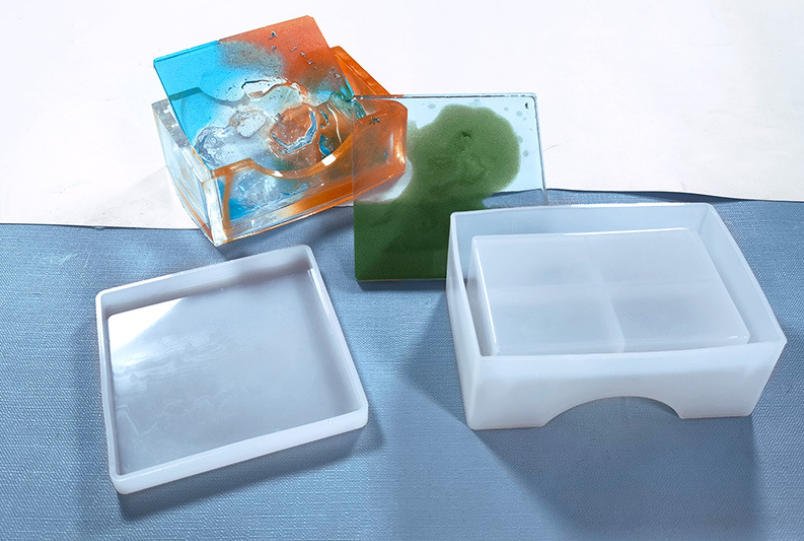
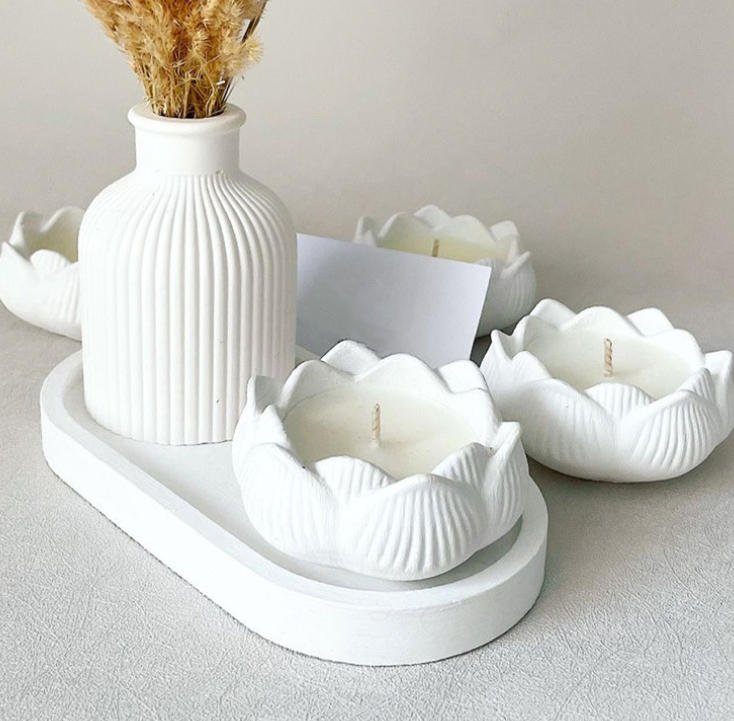
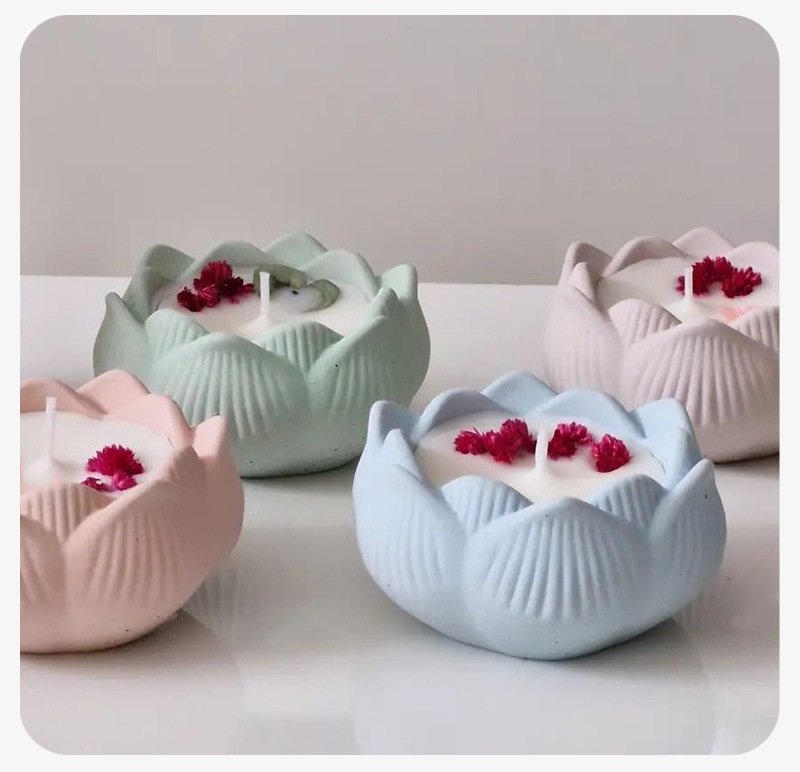
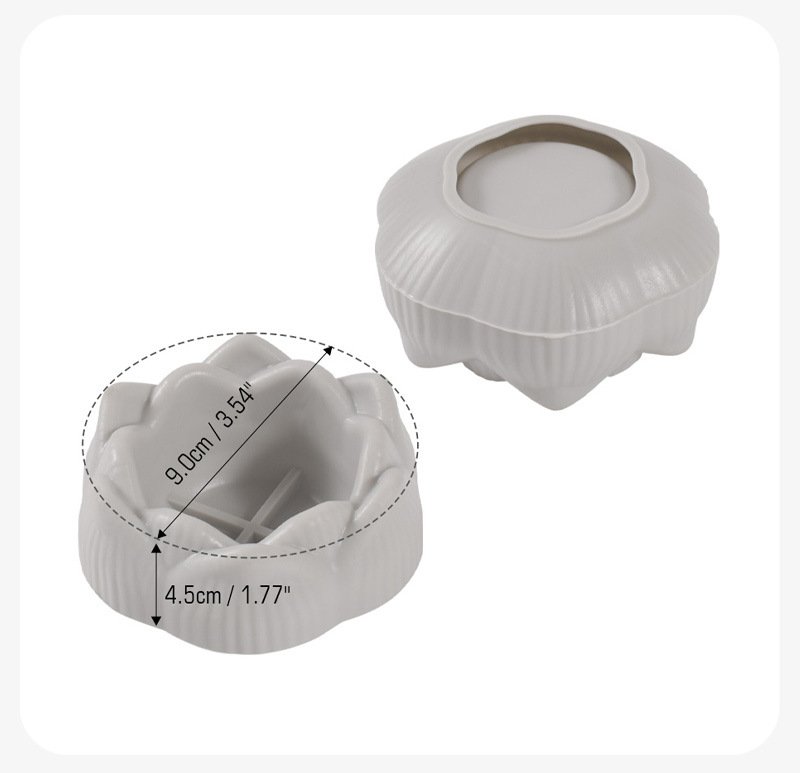
2. The Lotus Storage Box Mold: Sacred Geometry Meets Function
The lotus flower holds deep symbolic meaning across many cultures—purity, enlightenment, and rebirth. In resin form, a lotus-shaped storage box becomes more than just a container; it becomes a meditation on beauty and function.
Design Features
The OCHCHO lotus storage box mold captures the organic curves and layered petals of the lotus flower. Key design elements include:
- Multi-Petal Structure: Multiple layers of petals create depth and realism.
- Lid and Base Integration: The mold is designed to create both the box base and the matching lid, ensuring a perfect fit.
- Smooth Interior: While the exterior captures every petal detail, the interior remains smooth for practical storage.
- Generous Capacity: Despite its decorative appearance, the lotus box offers ample space for jewelry, trinkets, or small treasures.
What You Can Create
Jewelry Keepsake Box
Create a special place for your most precious jewelry. The lotus shape adds meaning to every piece stored within.
Ring Holder
Place the box on your dresser and use it specifically for rings. The lotus petals make a beautiful backdrop for your daily rotation.
Gift Box
Present a special gift inside a handmade lotus box. The container becomes part of the present.
Meditation Aid
Fill the box with meaningful objects—crystals, written intentions, or dried herbs—and use it in your meditation practice.
Project Idea: Pearl-Infused Lotus Box
Materials Needed:
- OCHCHO lotus storage box mold (both lid and base cavities)
- Epoxy resin
- Pearl-ex powders or iridescent pigments
- Mixing supplies
- Fine glitter (optional)
Step-by-Step:
- Prepare Both Mold Sections: Clean the lid and base cavities thoroughly.
- Mix Pearl Pigments: Prepare your resin and divide it into portions. Add pearl-ex powders in shades of white, pink, and soft gold to create an iridescent effect.
- Pour the Base: Start with the base cavity. Pour a thin layer of your lightest pearl color, tilting the mold to coat the petals. This ensures every petal tip is colored.
- Layer Colors: Continue pouring, alternating between pearl shades. The petals will naturally catch different colors as you pour.
- Pour the Lid: Repeat the process with the lid cavity. Because the lid is visible from above, pay special attention to the top petals.
- Bubble Check: Use a heat gun on both sections. The detailed petal areas can trap bubbles, so be thorough.
- Cure: Allow both pieces to cure completely. This may take 24-48 hours.
- Demold Carefully: Gently flex the silicone around each petal. The lotus design has undercuts (areas where the silicone wraps around the petal), so take your time. OCHCHO’s flexible silicone is designed to release complex shapes like this.
- Test the Fit: Place the lid on the base. It should sit perfectly. If there’s any resistance, lightly sand the contact points.
- Finishing Touches: If desired, add a small knob or bead to the center of the lid for easier lifting.
Creative Variations
- Color-Changing Effect: Use thermochromic pigments that change color with temperature.
- Botanical Embedment: Press tiny flowers into the petals during pouring.
- Metallic Accents: Use gold or silver mica powder on the petal tips for a gilded look.
- Glow-in-the-Dark: Add glow powder to the resin for a box that illuminates at night.
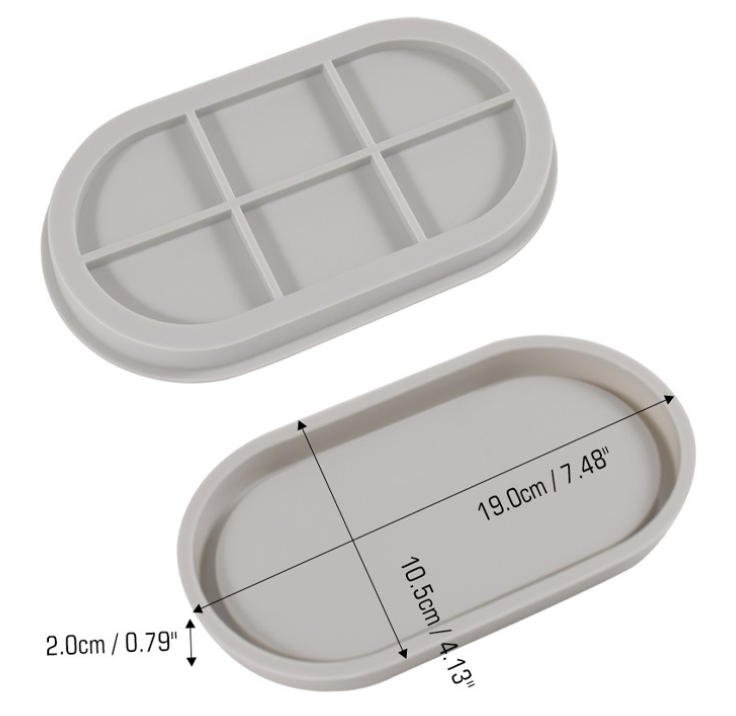
3. The Oval Tray Mold: Everyday Elegance
Every home needs trays. They corral remote controls, display candles, hold jewelry, serve breakfast in bed, and organize vanities. But most trays are afterthoughts—utilitarian objects without beauty. The OCHCHO oval tray mold changes that.
Design Features
The oval tray mold creates a gracefully curved tray with:
- Raised Edges: Perfect for containing small items without spilling.
- Smooth Curves: The oval shape is timeless and fits seamlessly into any decor.
- Generous Surface Area: Large enough to be useful, but not so large as to overwhelm.
- Versatile Size: Suitable for everything from bathroom organization to coffee table styling.
What You Can Create
Vanity Organizer
Create a tray to hold perfumes, makeup brushes, and daily jewelry. Customize the color to match your bathroom or bedroom.
Coffee Table Tray
Make a statement piece for your living room. Fill it with candles, coasters, and small decorative objects.
Serving Tray
Create a food-safe tray for serving drinks or breakfast in bed. (Ensure your resin is food-safe if using for serving.)
Key and Mail Catcher
Place it by the front door to catch keys, mail, and sunglasses as you walk in.
Project Idea: Ocean-Inspired Serving Tray
Materials Needed:
- OCHCHO oval tray mold
- Epoxy resin (food-safe grade if for serving)
- Blue and white alcohol inks
- Gold mica powder
- Real sand (clean and dry)
- Small shells (optional)
- Mixing supplies
Step-by-Step:
- Mold Preparation: Clean your oval tray mold thoroughly.
- Create the Base Layer: Mix a small amount of resin and tint it with white alcohol ink. Pour a thin layer across the bottom of the tray. This will become the “foam” where waves meet sand.
- Add Sand: While the base layer is wet, sprinkle clean sand along one edge of the tray. This will be the “shore.” Press gently to embed.
- Partial Cure: Let this layer cure until tacky.
- Ocean Layer: Mix more resin and tint it with blue alcohol ink. You can create gradients by using different shades. Pour this over the rest of the tray, allowing it to flow toward the sand edge.
- Wave Details: While the blue layer is still wet, add drops of white ink and swirl gently with a toothpick to create wave patterns.
- Gold Accents: Dip a brush in gold mica powder and flick it over the surface for a shimmering effect, like sunlight on water.
- Shell Placement: If using shells, place them now, pressing gently into the resin.
- Bubble Removal: Use a heat gun carefully—too much heat can disturb your wave patterns.
- Cure: Allow the tray to cure completely.
- Demold: Flex the OCHCHO silicone and release your tray. The raised edges should release cleanly.
- Final Polish: Sand the bottom edges lightly if needed. Your ocean tray is ready to use!
Working with Larger Molds: Tips and Techniques
Home decor molds like vases, boxes, and trays introduce new considerations compared to smaller jewelry molds. Here’s what you need to know:
Deep Pour Considerations
Vases and deep boxes require thicker pours of resin. Standard epoxy resins generate heat as they cure (exothermic reaction). In deep pours, this heat can become excessive, causing cracking, yellowing, or even smoking.
Solutions:
- Use resins specifically formulated for deep pours.
- Pour in layers, allowing each layer to partially cure before adding the next.
- Monitor temperature and move the piece to a cooler area if it gets too hot.
Structural Integrity
Larger pieces need to be strong enough to withstand handling and use.
Tips:
- Ensure complete mixing—improperly mixed resin can remain soft.
- Allow full cure time before demolding (don’t rush).
- Consider adding reinforcements for vases that will hold water (some makers pour a clear coat inside after demolding).
Demolding Complex Shapes
The lotus box, with its intricate petals, requires patience during demolding.
Technique:
- Start at the edges and work inward.
- Flex the mold in multiple directions, not just one.
- Use a soft tool (like a silicone spatula) to gently separate mold from resin if needed.
- Never pull the resin piece—flex the mold away from it.
Finishing Large Surfaces
Trays and vases have large visible areas that may need finishing.
Methods:
- Wet sand with progressively finer grits (400, 800, 1200, 2000) for a glass-like finish.
- Use a polishing compound and soft cloth for final shine.
- Apply a UV-resistant top coat if the piece will be in direct sunlight.
Color and Design Inspiration for Home Decor
Modern Minimalist
- Color Palette: Grays, whites, blacks, and neutrals
- Techniques: Single-color pours, subtle textures
- Inclusions: None or minimal (metallic threads, simple lines)
Bohemian Eclectic
- Color Palette: Earth tones, warm neutrals, pops of color
- Techniques: Layering, embedding natural elements
- Inclusions: Dried flowers, feathers, wood slices, shells
Coastal Serene
- Color Palette: Blues, greens, sandy beiges, whites
- Techniques: Swirls, ombré, texture
- Inclusions: Sand, shells, sea glass, rope fibers
Glamorous Luxe
- Color Palette: Metallics (gold, silver, rose gold), deep jewel tones
- Techniques: Geode effects, metallic leaf application
- Inclusions: Crystals, glitter, metal flakes
Organic Natural
- Color Palette: Greens, browns, mossy tones, cream
- Techniques: Embedding, textured surfaces
- Inclusions: Real moss, pressed leaves, wood pieces
Caring for Your Finished Home Decor Pieces
To ensure your handmade treasures last for years:
Vases:
- If used for fresh flowers, change water regularly.
- Clean with soft cloth—avoid abrasive scrubbers.
- Keep out of direct sunlight to prevent yellowing.
Storage Boxes:
- Dust with soft brush.
- Avoid dropping or banging.
- Store away from heat sources.
Trays:
- Wipe clean with damp cloth.
- Not dishwasher safe.
- Avoid sharp objects that could scratch.
Why Choose OCHCHO for Home Decor Molds?
As you venture into larger projects, mold quality becomes even more critical. OCHCHO’s home decor molds offer:
Superior Silicone
The same high-quality silicone that made OCHCHO famous for jewelry molds is used in these larger pieces. It’s flexible enough for complex shapes like the lotus box, yet durable enough to maintain its form through multiple uses.
Thoughtful Design
Every curve, every petal, every stripe is carefully designed. The lotus box releases cleanly despite its undercuts. The vase stripes are crisp without being fragile. The tray edges are perfectly proportioned.
Two Elegant Colors
- Gray (Pantone 428C): A sophisticated choice that complements modern decor and provides a neutral base for creative pours.
- Semi-Transparent White: The classic choice for seeing your pour as it happens, ensuring perfect placement of inclusions.
Flexible Packaging
Whether you’re a production maker buying in bulk (PE dust bag) or an individual crafter wanting a beautifully presented mold (OPP set), OCHCHO has you covered.
Conclusion: Bring Your Art Home
There’s a special satisfaction in walking through your home and seeing objects you created with your own hands. The vase on the mantel, the box on the dresser, the tray on the coffee table—they’re not just decor. They’re expressions of your creativity, your style, and your skill.
With OCHCHO’s home decor silicone molds, you have the tools to transform your living space. The striped vase mold invites you to play with light and line. The lotus storage box mold challenges you with intricate beauty. The oval tray mold offers endless possibilities for everyday elegance.
Whether you choose the sophisticated gray (Pantone 428C) or the classic semi-transparent white, whether you buy in bulk or as a single set, you’re investing in quality that will serve you for countless projects.
So look around your home. See the empty spaces waiting to be filled with your art. Then gather your resin, your pigments, your inclusions, and your OCHCHO mold. It’s time to create something beautiful—not just to wear, but to live with.
Contact me for custom procurement.:silicone@silic0ne.com